Friday, December 24, 2010

Christmas Eve

I hope you are all coping with your preparations for the big day!
As usual, apart from the obvious Getting Ready for Christmas Day stuff, I've found a couple of crafty type things I'd forgotten about.  Like a card for hubby, for instance....ooops!
That's done now and I'll show it in a day or two. Today I'm sharing a few voucher/gift card/magazine subscription presentation things I've made in the last couple of days - Last Minute Minnie strikes again!
- but maybe if you're the same you're still looking for some quick ideas and these might help
The first are three variations on the same theme - a three fold piece of Bazzill with some sort of pocket on the central section to hold the card or voucher.
I've made two creases down each end of the long side card about 3mm apart - this means there's room for the gift card pocket without it all looking a bit squashed.  I hope that makes sense.
1. i-tunes card holder
I made a pocket to hold the gift card using a long piece of paper.  The string goes right round and the ends tie through an eyelet hole on the flap.  The "belly-band" holds it all closed.
2.  Magazine Gift Card holder:
My uncle's magazine subscription comes with a postcard type gift card, so I made a really simple pocket to hold it in the centre section of this gift wallet.
3.  Magazine Renewal
I used some leftover die cuts from the last lot of Christmas cards I made on the front of this wallet.  It looked a bit bare so I glitttered the front section.  The little renewal card was made using Ppaint Shop Pro, then printed  out and attached to the inside of the card - the circles are Card Candy from Creative Treasures.  The wallet is held together with ribbon
3.  New Magazine Gift Subscriptions
For these I bought the current issue of the magazine, scanned the cover and used a bit of Paint Shop Pro magic to change the wording on the scanned image.  I used the clone brush tool to remove the existing wording, then added my new text.  I resized the entire image, printed it out then glued it to a "sleeve" of paper that goes right around the front of the magazine.
You have to look closely to see the message though - another time I'll just print the "new" cover off full size.  Never mind, it amused me!
Somehow I don't think I'll be blogging tomorrow so I'll wish you all a Very Happy Christmas now.  I hope all your Christmas wishes come true and that you and your family enjoy a very special time together.

Tuesday, December 21, 2010

It Must be Christmas

The house is a tip - it's looking a bit like a cardboard box shop, but bit by bit we're getting there.  I'm especially excited now because I had a phone call to say my aunt and uncle are on their way.  It was beginning to look like they weren't going to make it down from Northumberland, but after many phone calls and a bit of research about the state of the roads they've decided to travel.  After a day or two here, they'll be going across to Oxfordshire to spend Christmas with their Grandson (and his mummy and daddy of course!).  Funny, as soon as I got the phone call to say they were coming it staightaway felt so much more Christmassy.
I thought it was time I did an update on some of the things I've been busy with.
I've been making various boxes, this one is for a button bracelet we've bought for one of the nieces
Our Christmas Tree theme is Black, Silver and White this year, and as I try to wrap the presents to match I've been making some little fancy trimming bits to add to the parcels - you'd think I'd finished making the gifts and stuff when I was faffing about with that sort of thing wouldn't you?  You'd be wrong....
Anyway, here are some of the gift trims I've made - sorry the colours look a bit odd (I forgot to do a white balance on the camera)
 
 Next, a little pillow box, cut out on the Craft Robo and decorated with another of my fancy bits - the tiny tag was made with a circle punch and Cuttlebug tree die
 
 Here's our tree - what you can't see is the mess of wrapping paraphernalia that I'm standing in the middle of to take the photo!


 I've started to decorate the hearth.  We over-bought on the new baubles so I have plenty to play with!  The little canvas on the left is the one I made last year for Bubbly Scrumptious using Websters Pages and other things from Caroline's shop.
 Finally. Hubby's bee going to work on the train this week - and walking up to town in the dark yesterday morning he realised how pretty the town's Christmas tree looked - so last night he braved the cold again and went up with his "proper" camera and the tripod to take some photos.  I thought I'd pop a couple here for you to see
 Right, I should get back to work.  I need to finish my cleaning, think of something to make for dinner and maybe even get a bit more of the craft list done if I'm lucky.  Then when our visitors arrive I can sit with them and wrap a few more things - got to multi task, at this time of the year, haven't you?
Thanks for visiting, hope you're getting Christmassy too!

Friday, December 17, 2010

I'm Dreaming of........Warmer Weather

...and over on the other side of the world my Daring Cardmakers' teamie, Keryn is enjoying just that, and about to start her summer holidays - and yes, I am feeling a tad envious as I look out of the window and see the snow flurries going past. bbbrrrr.
So just to rub it in Keryn's asked us to use beach holidays as our inspiration this week. It can be a Christmas card using warm, beachy colours, or a vacation themed card and you'll find both examples on the DCM BLOG this week.
It seems like whenever a summer or seaside themed card is called for I reach for these papers, but never mind, they are gorgeous and fun, and using them always cheers me up.
I made the little tiles by cutting out some of the images from one of the pages, adhering to card.  Once they'd been trimmed the curved corners were made using my Zutter corner rounder.  The sun was also cut from one of the papers.  
It's a very simple card, but a thief has stolen away so much of my time this week!
I used:
Papers: Rusted Sun (Fancy Pants),, 
Sentiment: "life is" was printed direct onto the card blank, 
"beach" cut on the Craft Robo using Ballpark (free font), 
Zutter corner rounder, scrap card, ink for edging
Getting through my crafting to-do list has been hampered as I've had hubby working from home since Tuesday as he's got a rotten cold.  I don't suppose he'd be popular if he spread his germs all around the office just before Christmas, but it means I have to limit the "noisy" stuff like printing and using Mr Robo - and sometimes even using the guillotine is frowned on hehe
I hope you'll get a chance to join in with Keryn's challenge this week - it was fun to play with summer things instead of the icy ones for a few minutes.  But now I really need to get on and finish the flip album I'm in the middle of, and the boxes I need to make or cover, and the notebooks, and the voucher holders....
Hope you're doing better than I am with your Christmas preparations!


Wednesday, December 15, 2010

Madness

If you've already visited my blog., you'll be aware that I failed dismally to "use up all my old Christmas papers rather than buy new ones".  No, I found that an impossiblility and have instead embraced as many new paper sets as possible.  Or so it seems.
So please can you tell me why that the cards I like best of those I've made this year are the ones with minuscule amounts of paper on them - and not only that, but at the weekend I even found myself making another batch of Christmas cards with paper that isn't Christmas paper at all.  Madness indeed.
It all started because I had to make a birthday card for my brother and dipped into some gorgeous new papers from Fancy Pants, bought to kick start the post-Christmas crafting as I always struggle with the "ohhh I've been doing Christmas stuff for so long I don't know how to make anything else" thing.
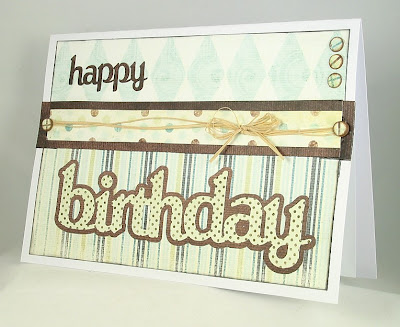
Anyway, I made this card - bigger than I usually make but I wanted to make the Robo cutting easy - and it's always easier when the letters are nice and big.
 It's a very quick and easy card because I left it till the last minute (again). A few bits of lovely paper, some faux brads and some raffia, along with the Robo words and it was done. 
And then I looked at the spotty and stripy paper scraps and before I knew it I was making more Cuttlebug minis for Christmas cards.  Honestly, it wasn't my fault.
These are just a few of them - once I'd started I couldn't stop - but I've got my fingers crossed I won't need to make any more now....though I do still have a few of the little shapes I could use if necessary!


Papers: Happy Together (Fancy Pants), Bazzill card, Stickles Glitter Glue, MS border punches, silver crochet thread, fine silver thread (baubles), Cuttlebug mini Christmas motifs, PC generated sentiments printed directly onto the cards.
The to-do list gets longer, so I'm not a very good blogger atm - and a rubbish blog-hopper too - but I will get back on top of it all soon!
Thanks for visiting

Friday, December 10, 2010

Snow Much Fun

You may already know my feelings on the subject of snow.  I don't like it! Or to be more precise, I don't like it on the roads and pavements - I think it looks wonderful everywhere else, but as we don't usually have much snow in England we're not really geared up to dealing with it and it always causes havoc when it puts in an appearance.  Which it has over the last couple of weeks.   We had only the lightest dusting here but I was still worried till Hubby was home safe - and I've been ringing to check up on my rellies in Northumberland, where the snow has been pretty bad even right on the coast where they live.
Anyway, this week it should have been Asia Wu's turn to set the challenge for the Daring Cardmakers, but the snow rather disrupted their house-moving plans and their schedule rather went to pot.  So instead of being snugly ensconced in their new house, complete with phones and web access all sorted out they find themselves in that horrible internet-less limbo-land this week instead.  So a quick shuffle of our calendar and an "emergency" challenge was called for.  It seemed right in the circumstances to choose a snowy theme!
Snow Much Fun
Any sort of card (Christmas, Winter Birthday, Winter Sports Fan etc) but it has to have a snowy theme.
I went for a snowflakes theme - mainly because I'd indulged in yet another Christmas/Winter paper collection.  oooops!
 Materials:
All papers; Bo Bunny "A Gift of Love", 
the snowflakes are all cut from papers in the set too.
Gorgeous Snowflake charm from Creative Treasures,  Blue satin ribbon (John Lewis), Silver, Pale Blue and Royal Blue gems from Anita's Gem Wheel. Blue and Silver metallic threads. Lots of Glamour Dust. Sentiment pc generated
 A close up of the glittery bits:
While I had the papers out I used some of the scraps to make some blue versions of the minimalist cards I showed yesterday using the Cuttlebug minis die.  I think these cards are my favourites for this year - hopefully I've now made all the Christmas cards I need - but as usual it's the ones I make last that I like best!  Which is why there's no point my starting to make them in January!


 And finally another mini dies card using Websters Pages
Next on my Crafty To-Do list - if the cards are really all done, are boxes and notepads, oh, and a card for my hubby needs to be made too. I hope you're all getting there with your Christmas stuff, its getting to that "aaaggghhh I don't think I can fit it all in" sort of time, isn't it?
Don't forget to check out the snowy cards over on The Daring Cardmakers Blog - the winner of our Flourish With A Bling sponsored dare is announced today.  Please do join in this week if you can, we'd love to see your snowy cards.
Thanks for visiting today

Thursday, December 09, 2010

Minimalist Minis

I'm not sure why this week has been less than productive, but it has.  That said, I've done a few of the last odds and ends of shopping, wrapped a few presents and even written a batch of cards (why is that bit so tedious?)  I've also made a lot of soup!  It must be the weather that's bringing on this desire to make soup and dinners with chilli in them.  We're luckier than most of the country too, hardly any snow and not as cold as so many of you.  That of course doesn't stop me moaning about being cold.  Thank goodness my aunt and uncle left one of their wheat bags here last winter and donated it to us - however did we cope without it?
I've not so much as stuck two pieces of paper together for the last few days, but I do have some  examples of some cards I made last weekend I can share.  


 I used:
Websters Pages 6x6 collections, Cuttlebug minis die, scraps of white, silver and gold card, gold thread, silver braid, Stickles, decal stickers sentiments (home made)
For these two I used:
Websters Pages 6x6 collections, Cuttlebug Trees die, Tiny punched stars braid, Satin ribbon (John Lewis), Organza ribbon (stash), 
decal sticker sentiments (home made)
Today I'm supposed to be catching up with my crafting so I'm going to get off here and get on with it or I won't have anything for the DCM tomorrow, and that's just for starters.  Apologies for not visiting your blogs these last few days, I'm still not sure what happened to this week!
Thanks for visiting,

Monday, December 06, 2010

Out of the Box

It was MIL's 70th birthday last week and that seemed a good excuse to make an exploding box - they are such fun to make and this one was a welcome break from Christmassy things too.
 
 It was also a good excuse to use more of those gorgeous GCD Paris Nights papers from the 8x8 pad, I've used loads already but the pad doesn't seem to get any smaller!.  The paper I've used to cover the main section of the box is flocked so it feels fabulous and the spotty one on the top is textured and shimmery so the whole effect is really luxurious.
 To tie together the black, brown and cream colours of the papers I made the rosette for the top of the box using 2 different colours of tulle (black and cream) for the outer section and 2 lengths of wide  organza ribbon (brown and cream) for the central rosette, it's all held together with a beautiful K&Co fabric and bead brad.  The whole box is tied up with coffee coloured ribbon as I wanted to make sure the lid wasn't lifted by mistake when she took the box out of the parcel it was sent in.
Bow undone, lid removed and all the "pages" fell apart to reveal lots and lots of family photos from our collection.

I did consider making them all B&W so they'd match, but decided instead to leave them in colour and then embellish the pages with the colours on the various photos.

I decorated the centre of the box with a Happy Birthday message and various flowers and trims.
She must have liked it because she took it out with her to show her friends when a gang of them met up for a lunch time birthday celebration.
Phew!
I am getting soooo behind with everything, and right atm I'm struggling to find the mojo to get on with all my crafty to-dos.  At least it's meant I've got down to some "admin" type jobs which are usually the ones that I put off!
It's really foggy, frosty and freezing cold too.  I looked at the Met Office App on my ipod touch this morning and it said it would be foggy all day - and that the highest temperature I could expect here was -2.  I don't like the cold!
I hope you're managing to stay cosy - it's my poor fingers that I can't seem to keep warm!
Thanks for visiting

Friday, December 03, 2010

I Love Turquoise!

Always have - and I really love turquoise when it's teamed with purple and a hint of silver.  They were the colours of my bedroom when I was about 13 - I think it was the first time I'd been allowed to choose and we even found some bedding and curtains in the same colours -I absolutely adored the finished room and as a sulky teen I spent a lot of time in there!  I'm still drawn to those colours.... I wonder if that purple Radley bag on my list will be under the tree on Christmas day.....

This week the Daring Cardmakers reach the very last birthstone of our year-long series and it couldn't really be a better stone to round it all off.  December's birthstone is the Turquoise (in case you hadn't guessed), so we're asking everyone to use the Turquoise as the inspiration  for this week's card-making.
We have a prize to give away this week too - a fabulous set of flourishes and stones is generously given by  Australian company 
Head over to the DCM blog to find out how you can win these gorgeous goodies
I did plan to make a glittering snowflake card but then I remembered that in my last box of delights from The Craftz Boutique were some lengths of tulle and one of them was turquoise, so I changed my mind and made a birthday card instead.


I used:
December sketch from The Sketch File
Rosette made from lengths of Tulle, Organza ribbon, Satin ribbon, large sparkly brad, 
dots of turquoise Ice Stickles on the tulle.
White card embossed with Cuttlebug Swiss Dots matted onto turquoise Bazzill Bling card, 
Long rectangle is Doodlebug Sugar Coated card, White lace slotted with narrow turquoise gingham ribbon. Sentiment is Robo-cut from the same Bazzill Bling using a slightly "engineered" Scriptina font
We'd love you to join in with our Turquoise challenge - it's such a fabulous colour to craft with and we're all looking forward to seeing what everyone makes this week.  You can see the cards the DT have made, and find out how to join in by visiting the DCM BLOG.
The Sketch File and Get Funky join forces!
 
Above is thee new sketch on the Sketch File, and you can also see it, and how the design team have used it for their December projects HERE.  We're thrilled to bits that this month's sketch is also being used for the Get Funky" Challenge blog, so there are even more inspiring projects to be seen for using the sketch - plus both teams have used Fabulous Funky Hand papers and other digi goodies to make all the things you can see on both blogs.


I used the "Contented Coffee" collection from Funky Hand's Colour Me Happy CD to cover the notebook and to make most of the decorative bits

 I first loosened the wires and removed the flimsy covers of the original notebook.  I cut slightly larger new covers from cereal packet chipboard.  The notebook is a "reporters" notebook so I printed 2 sheets of  the gingham design to cover them, trimming a few cms of the short side so that when the paper was folded around there was about 2cms margin all round on the reverse. 
At this point I used the original covers as a template to punch the holes at the tops of the new covers, then the book was reassembled.

All the papers are Funky Hand , even the flowers used for the focus decoration. To make the flowers strong enough to use in a 3D way I laminated a sheet of the flowery paper for extra strength then cut out some of the flower shapes and sewed buttons front and back to get the dimension then added some Stickles to the tops - when the glitter was dry I added a coat of Glossy Accents.
 Once all the decorative bits on the front were done I used another sheet of the FH paper to cover the inside of the new covers - leaving this till last means that if you've used brads or sewn things on to the covers all the messy bits will be concealed!
Summary of Materials:
All papers from Colour Me Happy (Funky Hand), Cereal packet chipboard, Buttons, Gingham ribbon, Pom-pom trim, Laminator and laminator pockets, Titl is Robo cut, Stickles (Fruit Punch), lots of extra ribbon knotted through the wires to finish
Please do join in and leave your links on both the Sketch File and Get Funky! this month.  If you used even ONE Funky Hand product and leave a comment over there you'll be in with a chance of winning a prize.  Even if you don't have any FH stuff yet you can still enter as there's a freebie download available on the downloads section of the shop site.
I've somehow managed to get way behind in adding stuff to the blog so I'll try to catch up over the next few days - I'll also try to catch up with my blog-hopping which has rather gone to pot this week!
Anyway, thank you for visiting my blog, I hope you'll leave a comment before you head off again :-)

Wednesday, December 01, 2010

Coffee, Cakes and a Stack o Gifts!

It's still very cold here, but at least we're not snowed in like most of the country seems to be - there is a little of the white stuff out there and I'm keeping my fingers crossed we don't get any more.  I know you're thinking I'm a real "bah humbug" but if the horrible stuff wouldn't stick around on the paths and roads then I'd be saying "oooooh pretty!" with the best of them.
As I've been such a rubbish blogger lately here we are on the first day of December (white rabbits to you all btw!) and I've completely failed to show the cards made with the November Crafty Templates yet.  I promise to (try to) do better next time!
Anyway, there are loads of fun templates in the collection - lots of cute animal ideas, some cupcakes, some mad bunny slippers and all sorts of other templates ready for you to make fun cards with and as usual with Leo's templates they give lots of scope for adding your own personal style.  
 
I used lots of layers for the cup and the cake on this "Coffee and Cake card£, but you don't need to do that - it can be as simple or as complicated as you like 
I used:
All papers are Prima Fairy Flora 6x6, MS border punch, Corner Rounder,
Ribbon, Glossy Accents, Stickles, pc generated quote
Next I used this fun "Stacked Cakes" templates to make a shaped card, again I layered the sjapes to get some extra dimension
I used:
SEI Chick-a-Dee papers, Stickles, coiled paper roses, punched daisies, ribbon
 As well as the Stacked Cakes, there's also a template for a lovely stack of gifts, which I decided to use for a Christmas card.  I thought I'd make the gifts as part of a collage, so I cut out sections from some Websters Pages and and layered them up then added a small die-cut Christmas tree to the mix.  The ready printed Kraft card blank was one that came in the last Crafty Goodies Kit
I used:
Websters pages 6x6 collection pack, MS scalloped border punch, gold crochet thread, Stickles, Spellbinders Nesties tree die, tiny gold punched stars
 
For all you need to know about Crafty Templates and the Crafty Goodies kits, see HERE
I'm actually supposed to be making my card ready for Friday's DCM but I'll need to thaw out my hands first!  Instead I decided to look for something different to give niece Izzy for Christmas as I'm not happy with the impulse buy I made.  I even knew at the time I wasn't convinced but I was just too eager to be done with it. 
Something will turn up, I'm sure.
Thanks for visiting - I hope you're managing to stay warm.