Monday, December 24, 2012

Christmas Eve

So, here I am "scribbling" a blog post when I should be cooking and cleaning and getting on with all the other things on my to-do list.  hmmm could that BFoP be in the house?

We usually end up buying vouchers or gift cards of some sort for people.  I used to think it was a bit of an easy option but in reality it means that they can get something they want rather than me just guessing.  We also buy magazine subscriptions for people - I love these as they are a gift that lands on your doormat every month of the year!

Anyway, I always end up needing to make some gift card/voucher holders to present them in as the cards you often get with them are soooo boring and impersonal.

Today's share is a decorated envelope for a gift voucher.
I used:
Kraft Envelope
6x6 papers from Simple Stories and Bazzill collections
Baker's Twine, Berries, Ribbon all from Creative Treasures

I've another one of these to make....yes, I know it's Christmas Eve!  ooops
Thanks for looking, 
I hope you have a Wonderful, very Happy Christmas
Best Wishes


Saturday, December 22, 2012

NEW! Funky Hand Inspiration Blog

Have you visited the "Get Funky" blog recently?  It's been a case of all-change there in the last few weeks - no longer is it a challenge blog, now it's a twice weekly inspiration blog with some great ideas from the design team - we're sharing tips and techniques for getting the most out of Funky Hand CDs and Downloads, plus projects we've made using this wonderfully versatile stash.  For example, on Wednesday Jackie gave instructions for making a fantastic calendar - what a great idea for those attempting to get organised in 2013!  There are already some great projhects and tips so it's going to be a fab resource for crafting ideas.  The Linky gadget is still there, and we're really hoping people will link their own Funky stash projects as we'd love to see what other people make.

Projects are loaded on Wednesdays and at some point over the weekend - and this weekend it's my turn.

This close to Christmas I thought maybe there are still people looking for gift wrapping and decorating ideas so I've given instructions on how to make a couple of star decorations which can either be hung up in the window or on the tree, or used flat to prettify your parcels
I've also highlighted some of the templates on the Funky Hand Papercraft CDs - things like the pillow box, Slice of Cake box, Gift card holder etc and shown reminders of a couple of boxes I've made over the last couple of months - one uses the pillow box template from the Twelve Crafters Crafting CD  and papers from the "Presents Wrapped" download.

For small gifts there's the origami box made from a couple of squares of pretty paper from the Daisy Day download - so easy-peasy to make and perfect to something like a piece of jewellery
And finally I've used some left-overs from other projects using the "Santa Baby" download to make this rosette.  I've made it into a tag, but I use this idea a lot to add some extra pizazz to my gifts as it's so quick and easy but looks so fancy!

Please pop over to the gorgeous new look "Get Funky and Craft" blog and check out all the lovely new ideas, and remember - if you're already a Funky Hand Convert we'd love to see what you make too - your projects don't have to follow on from ours, they can be anything at all
Have a great weekend
  
   
Visit Get Funky and Craft HERE
Join in with Join in and share what you make with the aCaD Daily Crafty Blogging group HERE 

Friday, December 21, 2012

Piecing it Together

It's Daring Cardmakers Day, and the last challenge of the year as we're "on holiday" next week.  We'll be back on January 4th to start a whole new year of challenges, but sadly our lovely Belgian-German teamie Rein is leaving us this week.  Rein has been a fabulous teamie, dedicated and inspiring and we are going to miss her hugely :(
The dare Sharon set us for this week suits Rein's quirky style to a T, so please pop over to the blog and see her fab card - and all of the other fab cards too, of course!
We have our on-going prize draw too - entering a card on last week's or this week's challenge - joining in with both gets you 2 entries.  This week's challenge runs till 4th January 2013 so plenty of time to get creative and maybe win our £10 gift voucher from
 - that would be a nice treat at the start of the new year, wouldn't it?
I was a bit stumped as to what to do for this one - it seemed a bit of a cheat just to cut something using Craft Robo as I do that so often that it's not really a challenge!  In the end I thought I'd make a triangle Christmas tree - I actually used one of the little trees from a Cuttlebug die with the "trunk" cut off.

I really wanted to use this paper with the FC image in the corner, but there's an awful lot of blank space left to use up - so I made the tree to stand out on a box hinge, and added hand-cut gifts at the bottom and some bunting across the top.  And a ribbon, and a tag - yes, I know, I do get carried away sometimes!
I used:
15cm sq white card, Green Bazzill
All other papers: Carta Bella 6x6 "Christmas Day"
Lots of Inks
Satin Ribbon, Baker's Twine, red and gold pearls all Creative Treasures
Dies: Cuttlebug Christmas Tree Minis, Spellbinders Nesties Circles

This one will probably be for OH - it'll be nice not to be making one on Christmas Eve for a change! Actually I think this would look OK made into a picture - it's a bit of a close cousin to a canvas I did a couple of years ago - I didn't realise how close till I checked the photo - it must have been in my subconscious since putting the canvas up in the dining room last weekend!, haha!

Well, that's me for today - though I still have Christmas crafting to get on with so more to share eventually!  I did tidy away the worst of the piles of Christmas related stash that was on and around my craft desk yesterday  it's really nice to just sweep all those "might be useful" teeny weeny bits of paper and glittery stuff into the BIN!  You've no idea how much pleasure that gave me!

Thanks for visiting my blog, I hope you enjoyed your visit and will add me to you reading list!


Join in and share what you make with the Daily Crafty Blogging group HERE 
Daring Cardmakers Blog is HERE
 

Wednesday, December 19, 2012

Tagging

I think tags are my least favourite Christmas "make", but for some reason I can't just go and buy them - occasionally I do buy a few totally plain ones in silver or gold, but mostly I just harrumph and grumble and cut some tag shapes which I then use with whatever bits of paper ands die cuts are leftover from the cards - stupid, isn't it?  Why bother when I don't enjoy it?
I love to see the beautiful tags made by Tim Holtz and those who follow those 12 Tags of Christmas ideas - they are stunning and relly, they are a gift in themselves - I hope they are treasured by those who find one on their parcel under the tree.
Anyway, mine are always rough and ready - and tbh I'm usually a bit ashamed of them - but they'll go straight in the bin so why worry?
This lot are also a bit rough and ready, but actually they don't look bad - they'd probably look better if I had the willpower to add a bit of bling, but I don't.
To make these I cut sheets of white A$ card into 3 pieces approx 9cms wide, then cut lots of shapes using the Memory Box "Frostyville Border" with various colours of card from my scrap box
Working on my non-stick craft sheet I used spray mount on the die cuts and then adhered them to the white card.  A piece of baking parchment is great for placing over the top while you rub your hand over to make sure all is stuck down.
Once dried I cut each of the die cut sections into 3, (there's a similar sized section left over from each strip for making a different sort of tag if I feel like it) then trimmed the plain end to tag shapes and used my cropadile to make the holes in the top.
The pile of tags grew really quickly, which made me happy :)
That's me for today.  I'm waiting for the bracelets I've been making to dry and then I suppose I'll need to make some boxes.....of maybe I could actually hunt out some of those I save for just such a reason and then can't bear to use....I know, it's madness.
Happy Days...


Join in and share what you make with the Daily Crafty Blogging group HERE 
Celebrate the Occasion
Craft Room Challenge
Die Cuttin' Divas
Card Mania

Tuesday, December 18, 2012

Wallington Hall

Have you noticed how things go a bit haywire around this time of year? hahaha
That's my excuse for missing a couple of blogging days - stuff just got in the way - stuff like finishing off the gift-shopping, getting the cards written out, getting the trees decorated, trying to make headway with the wrapping... Well, I think the tree is done (always room for a "tweak") and I think I've finished the gift shopping (hope the online stuff arrives in time), but I've not finished putting the other decorations up or finished the card-signing, or anywhere near finished wrapping.  Actually, I've not even finished making those beady presents I set myself to do - I've a feeling the notebooks I planned to do will just stay a "plan"

Anyway, it's Sketch File Update day and I'm sharing the  layout I've done for my mini album- yes it's the same one I've been working on for the last year or so, but I think I'm getting near to the end now.
As an Anniversary present to ourselves we took out  a years' membership of the National Trust in July 2010, so the book will show all the NT properties we visited between then and the end of July 2011.  I don't work quickly, do I?
This is Wallington Hall in Northumberland
 I used
December Sketch File LO - see below
Bazzil card, Bo Bunny papers
Assorted paper flowers for layering
Green leafy braid, Pearls and Gems

December Sketch File Layout
There are som great ideas for using the sketch - for Christmas and other occasions over on the blog, so please pop over to see them - scroll down through the last few posts to see them all.  It would be fab if you'd join in and play along with us.

Right, it's back to a beading project for me now.  I hope to goodness that you are better organised than I am, because this is n o fun - but it happens every year, despite my annual promise to myself to do better! :o  hey ho

Friday, December 14, 2012

Cheeky Little Monkeys!


It's Samm's turn to set the challenge for the Daring Cardmakers this week and this one is definitely a bit "off the wall"!, She says:

"...well, it's International Monkey Day today, 14th December, so what better way to celebrate than to set a challenge to include some   Monkeys  on your cards this week"
We also have a lovely treat for one lucky Linker to start 2013 off with a 
£10 Gift Voucher
to spend at
 Our last challenge of 2012 is on the 21st Dec, but  you'll be able to add links for this and next weeks' challenges right up to the first dare of 2013 going live on January 4th - that means you have three weeks to make a card for either (or both), add your links and be in with a chance of winning some lush new stash from The Ribbon Reel to get your new year crafting off to a flying start.


The team have come up with some fab cards - they are just amazing at rising to a challenge that initially makes you go "whhhhaaaaaa>"
My own first thought was to check out my "library" of templates from Crafty Templates - Leo often adds some really quirky designs to the kits so I checked back through the archives and found this "Monkey in a Tutu"!
I cut the various layers with my Craft Robo, mirroring some to make the back view of the monkey, then added a length of silver thread between the layers so that she twirls in the aperture.
I used:
Image: Monkey in a Tutu from Crafty Templates (September 2010)
Papers: Everyday Eclectic 6x6 (Echo Parl)
Bazzill Card (Brown, Ecru, Pink, Black, White
Silver thread
Dies: Spellbinders Nesties Circles, plain
Craft Robo: to cut the monkey and also the fluted circle background for the sentiment
PC generated sentiment

Visit  the Daring Cardmakers blog to see lots more cheeky little monkeys this week - we hope you'll join in and have a bit of fun with this challenge!

Thanks for visiting, Please come back soon - Don't forget you're welcome to join in with the aCaD  Daily Blog roll and leave a link to your crafting HERE


Thursday, December 13, 2012

Colour Pop Mini Baubles

I was busy making my DCM challenge card ready for tomorrow's tricksy dare yesterday and completely forgot to blog this one,
I've used more of the bits left over from last week's DCM and I really like this design.  Why is it that the ideas I'm most pleased with arrive right at the end of the Cword card-making season?  This is almost always the way and the main reason I don't make Christmas cards throughout the year -I know without a doubt it would be a waste of time as I'd hate any that I'd made pre last minute!
The baubles are tiny - only about 1cm diameter, so they are very cute, and the layer of Glossy Accents makes them look so much more real - this would be the part that might prove a bit too time-consuming for making in bulk though
I used:
Distress Inks in various shades to build up the colours on smooth white card
Gold pen, White pen
Glossy Accents.
Gold thread
Black and White card for the panel
Decal sentiment sticker (home made using printable decal paper from Crafty Computer Paper)
Gold Glitter card for stars to secure thread ends
Craft Robo to cut the baubles
EK Success star punch (6 stars in a circle shape)
I've now pretty much run out of cut out bits to use, and there's not much of the inked card left to cut any more - but bearing in mind I only used one A4 sheet for the inky bits I don't think I did badly to get these cards made.  I might be able to squeeze one more if I do some very careful die-cutting!

I'm off to add this to today's Linky on the aCaD blogging group and to the FB group before I forget!


Thanks for visiting, Please come back soon
Don't forget you're welcome to join in with our aCaD Daily Blog roll and leave a link to your crafting HERE


Tuesday, December 11, 2012

Colour Pop

Before I share my project for today, just a reminder that as it's Tuesday, it's Sketch File Update Day and there are 1 lovely new cards to see over there - this week Jackie and Brenda have things to share.

On Friday, I mentioned I had a few die cuts and bits of inked up card left over from those I made using Gez's wonderful colour palette.
I've now made a couple of cards using them, though one is still drying (don't prod the Glossy Accents, Kathy!) so that will be for tomorrow.
I really like this Colour Pop idea and I wish it had come a bit sooner in the Cword card making season as this was so quick and easy to do and is a bit different from my usual choice of rather sludgy reds, greens and golds.
I hope you like it
I used:
Distress Inks for colouring the card
White card, Black card
Dies: Spellbinders Nesties plain circles, Cuttlebug Trees
Sentiment decal sticker
Punch: EK Success 6x stars

Thanks for visiting, Please come back soon
Don't forget you're welcome to join in with our Daily Blog roll and leave a link to your crafting HERE


Monday, December 10, 2012

Cheers Bro!

After a considerable amount of BFoP (Bad Fairy of Procrastination), plus a lack of willpower and a lack of inspiration I finally got my brother's birthday card made. I'm quite pleased at the way it turned out in the end, which makes a pleasant change!


I used:
Image from "Happy Happy Birthday" CD from Funky Hand
Ribbed, Kraft card (PDA) for the base
Bazzill:  grey, cream, various shades of brown
Paper from scrap box for the sentiment background
 Ice Stickles
Thin gold wire
Craft Robo
There are lots of layers on this one to build up the dimension.  I used pieces of wire to attach the "splashes" fixing the ends between layers of card
The sentiment stands out from the card on a box hinge

That was my crafting at the weekend - I have loads more to do but that BFoP is here and I really need to kick her out.  I also need to clear my desk - that "6" square space left  to work" in thing has happened again!  Wish me luck.....I may be gone some time...........


Thanks for visiting, Please come back soon
Don't forget you're welcome to join in with our Daily Blog roll and leave a link to your crafting HERE


Friday, December 07, 2012

Colourful December

 Today is the first Friday of December and time for a Colour Combo Challenge on the Daring Cardmakers
This time Gez has chosen the combo and it's such a pretty palette of colours!

They may be a little unusual for a Christmas card, but the baubles in the photo inspired me to make some of my own
Here's my card
 I used:
Various Distress Inks to create the colours on a sheet of white card
Craft Robo to cut the fairy lights and baubles
Trees are cut using a Cuttlebug die 
Stars are cut with an EK Success
6 stars in a circle punch
Baker's Twine inked with darker green for the strings
Matching Stickles shades on the stars
Gold, White, Black gel pens
Gold thread
Glossy Accents
The lights and baubles are raised slightly on tiny scraps of cereal packet chipboard
This is our Inspiration Photo for this week's challenge:


And a bit of a closer look at the bits and bobs on my card


I've got a small amount of the coloured card left over - hoping there's enough to make a couple more cards using these gorgeous colours
You can see more cards made using these pretty shades over on the Daring Cardmakers blog, and we're hoping you'll be inspired to join in and make something to share with us this week.


Thanks for visiting, Please come back soon - Don't forget you're welcome to join in with our Daily Blog roll and leave a link to your crafting HERE


Thursday, December 06, 2012

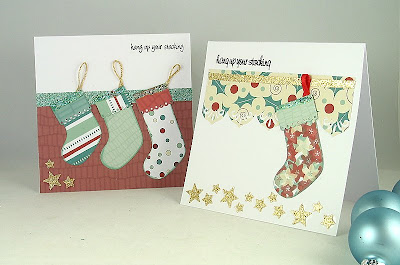
Hang up Your Stockings

For today#s cards I've used up the last few scraps from the papers I printed to use on my canvas for last weekend's Funky Hand and Tiddly Inks joint Blog Hop.
These are just the extra Funky Hand papers I printed to make the borders, banners etc, I didn't over-print with the houses image on these.
I used:
papers: Funky Hand "Stylish Tree download
Gold thread, Red Ribbon, 
Gold and Aqua Glitter card, Stickles Ice glitter glue
Gie: Memory Box Stocking
Decal sticker sentiment
Punches: EK Success Border punch, various star punches

It's a funny thing, but I've not really found this die easy to use - maybe it's just a bit big for the card size I like to use for my Christmas cards. I played around a bit with it on the first card making different lengths of stockings - I'm thinking that actually the smallest one which is cut down quite a lot looks the best.
  I might dig out my old QK die again, or maybe I should cut some with Mr Robo!

Thanks for visiting today I hope you'll come back soon 
Don't forget to join in with our Daily Blog roll and leave a link to your crafting HERE

Wednesday, December 05, 2012

Naughty!

I was a bit naughty the other day and succumbed to another Christmassy die and a couple of new Christmassy 6x6 pads - I have quite enough of both and promised myself I wasn't going to buy more.  I especially don't need the papers as I have all the lovely Funky Hand ones just sitting at my beck and call on the pc. 
My willpower is low!
I used some of the new paper on the card I shared on here yesterday and this card is made using the new die - or at least part of it.  It's a little bit too long for my Christmas card favourite 12x12  size so I snipped off a snowflake and a bit of the frilly stuff.
It's a die from the Whimsy Stamps people and it's pretty isn't it?  BUT I will warn you - just in case you're tempted, that it's very very fiddly - those swirly bits connecting the snowflakes are VERY skinny and fragile to work with, and the holes on that snowflake 2nd from the left are really fiddly to get out.
Materials and Tools
Green Bazzill card
Gold Glitter card
Small green gems, Gold thread
Dies: Whimsy snowflake border, BossKutz Bauble
Punch; EK Success Snowflake
Craft Robo "Christmas" header template

I would say this is a quick and simple card - but it takes longer than it should because of that fiddly die - pretty though!

Thanks for visiting today I hope you'll come back soon 

Don't forget to join in with our Daily Blog roll and leave a link to your crafting HERE

Tuesday, December 04, 2012

Hanging Out

Well, I'm pleased to say that I've finally started my Christmas shopping - I'm aiming to keep it really simple this year because I'm struggling to get into any sort of Christmas Spirit and maybe not letting it all get too stressful and complicated is the best way to cope. I keep saying that it's because I'm still waiting for the Summer to arrive - how can it be Christmas when we haven't had a summer yet this year? hehe
Classic FM have started playing Christmas music though, so maybe that will help - I do love a good old sing-along!

It's the first Tuesday of the month so there's a new LO idea on The Sketch File
Here's my first project using the new sketch


 Materials and Tools
Papers: Carta Bella 6x6
Glitter card; Red, Gold
Gold Crochet thread
Gies: Spellbinders snowflakes from several sets
Punches: Martha Stewart, EK Success, Woodware

This is the sketch
Or maybe you could use it like this:

Thanks for popping by today, I hope you'll visit again soon - Don't forget to join in with our Daily Blog roll and leave a link to your crafting HERE

Sunday, December 02, 2012

Funky and Tiddly...

The joint Funky hand and Tiddly Inks blog hop is still going on and you still have time to join in and maybe get your hands on one of the fab prizes.
Check Anice's blog or Christy's blog for more info, but to make it really, really easy, here's the list of all the blogs you need to visit and leave a comment at
Asa
I've been playing with the bits and pieces I had left over from my print runs and made a few cards.
This is one of them
My "real" blog hop post is the one below this, so if you are joining in with the hop you'll need to leave your message HERE

Hope you are having a lovely weekend, thanks for visiting, Please come back soon - Don't forget to join in with our Daily Blog roll and leave a link to your crafting HERE

Friday, November 30, 2012

Funky Hand meets Tiddly Inks!

It's the day of the Big Blog Hop!
Are you ready to get "Finky" with us all?!!


The awesome talents of Funky Hand’s Anice and Tiddly Inks Christy have come together, along with their gorgeous DT’s to have a little fun collaboration blog hop and showcase Anice’s delicious papers with Christy’s lovely images. You should of come to me from Jodi's blog so If I am your first stop please check out the hop order over on the Christy's blog or Anice's blog so you don’t miss any info you need!

"So, why Hop you ask? Well, there will be a lovely prize from Anice and Christy for their stores and a whole tonne of inspiration from a team of gorgeous crafters who have put together some mouth watering yumminess to share with you all.
You will have until December 3rd at 12am CST to comment on the blogs for our fabulous Tiddly Inks Prize of a $20 gift certificate to any digital item in the Tiddly Inks Store!  and a £20 voucher from Funky Hand. YOU won't want to miss it."
I love digital crafting!  All my favourite Funky Hand papers are at my fingertips and I never run out!
And then as I don't do much stamping digi images are perfect for me - they are always there for those occasions when I need to use something like that!  The best part, I think is having the ability to resize according to your whim!

I needed a change from all those Cword cards so I've decorated a canvas using the Funky Hand and Tiddly Inks products.  Not only was it was great fun, but it helped kick-start my ailing crafty mojo!


My Christmas Canvas

All of the papers (apart from the glitter card) are from Funky Hand's "Stylish Tree" download collection
From Tiddly Inks I used "Our Village" image from the "Harmony at Home"  digital set

I'll do another post later to tell more about how I made this canvas
I hope you like it, it will be on my mantle-piece in a few weeks time!
So now please hop on over to Karen's blog to see what she has to share with us all!!
 Don’t miss anyone out because all the projects are fab - and of course you've got to be in it to win it - as they say hehehe
Thanks for visiting and for taking part in our Big Blog Hop


Game On!

Woke up to a very frosty scene out there - the first frosty morning this Winter, I guess that means Christmas is coming and that I should stop fiddyfaddying about and actually get some presents bought.  I think that the top and bottom of it is that for some reason I just can't be bothered with it this year.
I'm going to have to give myself a good talking to and a good old shake and make an effort - and I really do think it's going to take a big effort....

Daring Cardmakers Day today and boy! did I struggle with this one!  

it's Rein here this week, my dare is called
Fun and Games
I'd like you to make a card which also has a little extra element of fun :
*It could include a game for the recipient to play
*Or you could put moving things on your card such as flapping wings or wheels that really work
*Or it can bee an advent calendar card with doors and windows  to open...

The team have had a lot of fun with this one and we hope our ideas will inspire you to join in - we're looking forward to seeing what you make.


I think maybe it felt a bit too close for comfort to getting back into teachery ways!  Eventually I went with a Christmas variation on "Pin the Tail on the Donkey"
The pin is actually a lump of blu-tack, but my brain hurt too much to think of anything better to use on a card,

It's a big 8" square card so plenty of room to plonk that fluffy nose in the "wrong" place

 Materials and Tools
Papers and image: Funky Hand (see * below)
Red Felt, Black and White card scraps, Black and White gel ink pens
Daisy Quilling die from Cuttlebug

 * I've used the Funky Hand "Twelve Crafters Crafting" CD from last year for the image and the papers. The blue background paper is from the "Wintry Magic" section and the other designs are all from the "Merry Christmas" set. 
The "Workspace" facility on these Papercraft Factory cds is brilliant!  
I printed the snowflake paper and the reindeer border all in one go.  All you do is select the paper and send it to the workspace, then drag the images over, resizing and putting into the places you want to use then before hitting the print button. 
I used the ready coloured version for the border design, but the outline version to make the large reindeer so that I could paper-piece him together in several of the designs.
 

I was going to make a pompom for the nose, but I don't have any red wool, so I hunted around for an alternative.  Using a Cuttlebug Quilled flower die and some felt was just an experiment, but it worked perfectly - and had the added benefit of producing a flat-backed  "pompom"
A nice easy card and not a bad idea for something to make with the kids.  If you don't have digi images that would work, try checking the web for suitable free colouring pages - then they can do the colouring too


Thanks for visiting, Please come back soon - Don't forget to join in with our Daily Blog roll and leave a link to your crafting HERE