Friday, May 30, 2014

Seeing Stars!

Zuzana is the hostess for the Daring Cardmakers Challenge this week:

  'Wish Upon A Star' 
Do you like watching the stars in summer? I believe everyone does! My favourite are meteor showers. You don't need any special equipment. Spread a blanket on the ground and look up into the dark night sky.

  Now, I would like to see stars on your cards. Create a project with a universe or astronomy theme, fairy-tales, sports, birthday stars, music rock stars, stars on the flag ... whatever you fancy!  
  There are some fabulous and inspiring designs from our Design Team - visit the BLOG to see them. 

Even though I quite often choose stars for those tricky male cards for some reason this time I found it quite hard to see beyond Christmas themes.  So I turned to my trusty Funky Hand stash and in particular the Papercraft Factory CDs - oh how fab these CDs are with so many paper choices, images and even templates for making all manner of things - all resizeable in the built-in workspace. 
The papers I've used are from the "Happy, Happy Birthday" CD and I've mixed the "Just for Men" and "Birthday Boy" colour sets to make this card
Papers all from "Happy, Happy Birthday" CD by Funky Hand printed on white Bazzill
large and small bunting is handcut
Large star punch, stars folded for dimension*
Inks, Bakers Twine
* to make the 3D stars, use a punched or die cut star then fold (wrong sides and crease on all the lines shown - try to avoid creasing too hard at the centre point (you might end up with a hole, or a "scuffed" patch if you do)
Open out and now form just the bits of the lines marked red into valley folds

Now just squeeze in on the folds on the pointed sections until you get the shape you like.  


I used Collal 3D glue to fix my stars to the card
That's it for this time, thanks for visiting - please leave a comment

Friday, May 23, 2014

Origami Challenge

It's Leo's turn to set the challenge for The Daring Cardmakers  this time:

"This week we're turning to Japan for our inspiration and more specifically to the art of paper folding,
Origami
I'd like you to use either something inspired by Origami on your card or to have a go at making your own Origami embellishment. There are lots of online tutorials to look at with lots of different origami designs perfect to use in paper crafting so it's well worth having a go. If you need more inspiration to kick start your imagination take a lookat the BLOG to see what the design team have cooked up, (and folded up!) this week"

Quite a few years back I had a phase of doing a bit of Origami, thanks to a little paperback book I had.  I remember making things like an elephant and a bird which, when you pulled it's tail, flapped its wings.  I didn't really get much further with my paper-folding though, and probably moved on to another of my Crafty Dabbles - lace making...candle making..or whatever else took my eye!

So, when I read Leo's dare, I thought it would be fun to revisit the craft and hopefully, with the (new) help of the t'internet with all those video tutes etc maybe I'd actually manage to get a bit further and have less squares of crumpled paper.......
Hmmm. or maybe not!
I must have looked at LOADS of tutorials, and even sat with my squares of paper and followed quite a few of them.   Some were really good and some started off fine and then got to a tricky bit and no amount of scrolling back and looking again helped show what the person was doing.
So, my bin is full of crumpled squares of paper - good job that in most cases I used squares cut from scrap paper. 
In the end though, I found Leyla Torres' "Origami Spirit" blog and things started to look a lot brighter.  Her videos are so clear and she explains carefully and at a lovely, slow pace what she is doing at every step.  From here I made this flower - taking her advice to use a supple, malleable paper so that tearing isn't so likely.  I used some handmade paper that matched the other papers I wanted to use.
Do you like the paper designs?   They are a sneak peek at a brand new, "coming soon" paper collection from Funky Hand..... gorgeous, aren't they?


Tools and Materials
Origami flower
"Hollow Petal Flower" - tutorial is HERE
Handmade Mulberry paper
Bacground
All papers Wash It All Away Download coming soon from Funky Hand 
(printed on white Bazzill card)
Spellbinders Leaf Swirl dies (top left and bottom right), Butterfly
Crafters Companion Leaf 2 (behind flower)
XCut Tiny circle punch to make "card candy" pink and aqua embellishments from scraps of the papers - shaped with an embossing tool
Ice Stickles (Crystal)

 It would be fab if you'd take a look at what the The Daring Cardmakers team have made this week for Leo's unusual challenge - and better still if you'd join in and fold some paper too!

That's all for this time, thanks for visiting


Friday, May 16, 2014

Fine Feathers

We've been away on a little jaunt and it's hard getting back into the regular routine, isn't it?  I've a few photos to share in a minute, but first as it's another Friday it means it's time for another Daring Cardmakers Challenge.
This week Sharon is in the Dare-setter's chair and her challenge is:

  Light as a Feather
As feathers seem to be on trend at the moment I'd like to see feathers on your card somewhere - and you don't have to take it too literally - you could think a bit beyond the feather and feature a whole bird!
As an extra bonus this week we have a fabulous prize to give away!   All you need to do is join in with the dare and we'll pick someone randomly next week to receive the prize.
This week's prize is generously donated by Sarah Keerie, an independent Stampin' Up Demonstrator.  She's offering the Hip Hip Hooray card kit to one lucky winner (or a stamp set to the same value).

Well, I knew it was a good idea to grab all those lovely freebies that are given away on the Silhouette shop site - you never know when they will come in useful! I didn't really need to use it - I do have various other feathery themed things I could have used - but I wanted to see how it cut as it looks quite fiddly, and fiddly things don't always work so well when cut small enough for cards.
 

Included in the cut file is the "membrane" bit (I'm sure there's a proper word for it) that goes up the centre of the feather shape.  Whilst the feather cut pretty well at about 7cms long, that extra piece was so skinny it would have been a right pain to stick in place so I didn't even bother trying!
It would have been good not to have to cut that piece at all, but if it's possible to separate the pieces on a cut file, well I don't know how to do it.  
When I make templates myself, I always save the component parts as separate "bits" so that I can use the ones I want.  
But hey, this was a freebie after all!
Materials and Tools
Papers: all from MME "Find Your Wings and Fly" 6x6 pads
White, Black and Orange Bazzill card
Silhouette machine to cut the feathers
Spellbinders scalloped and plan circles for the bird's body
Eyes: XCut punch white circles, black circles cut with Cropadile, white dots added with Posca pen
Feet and beak are hand cut from card scraps
The body and head of the bird are mounted on "box" hinges so they fold down for posting

I think I lowered the rather lovely and serene tone of the Daring Cardmakers blog this week haha with my rather flustered-looking birdie - do pop over and see the beautiful cards the rest of the team have made!

Anyway, back to our trip
We headed up to Yorkshire for a little holiday recently - we drive up and down the A1 fairly regularly,  but as it was a lovely day, we veered further east into "new pastures" to visit  Gainsborough Old Hall.

 This is the Great Hall


We didn't head back to the A1, but continued our journey north on quieter roads - which meant we could get the roof off and enjoy the sunshine (if not the pollen).  Our new route took us via the Humber Bridge - another "first" for us - you can see it snaking across this first picture
 And an attempt at an artyish shot ....

I'll get some photos of where we stayed sorted out and post those next time - so be warned!

Thanks for popping by today

Wednesday, May 14, 2014

Family Favourites


If you saw the "Tool Shed" programmes on Create and Craft this past weekend you might have seen some of the things I made using a couple of the Crafters Companion "Create a Card" dies.


These dies are just fab!  What they don't do is cut any sort of outline shape - instead they cut all the little shape details and a centre piece out of the card stock, then with a second pass through your machine they emboss more of the pattern.  This means that you can actually cut the pattern anywhere you like on a piece of card, with the only limitation being the size of card your machine will take.

For instance, if you have a machine that takes A4 card, you can put the design in the centre of an 8x8 card blank just be leaving the card blank open then carefully placing the die in the centre of  what will be the front of the card ( a few bits of washi tape will help to keep it in exactly the right place) and running through your machine.
Fold the card and it's ready to embellish - though if you like a clean and simple style, it won't take much of that  as the designs are so pretty and intricate already.


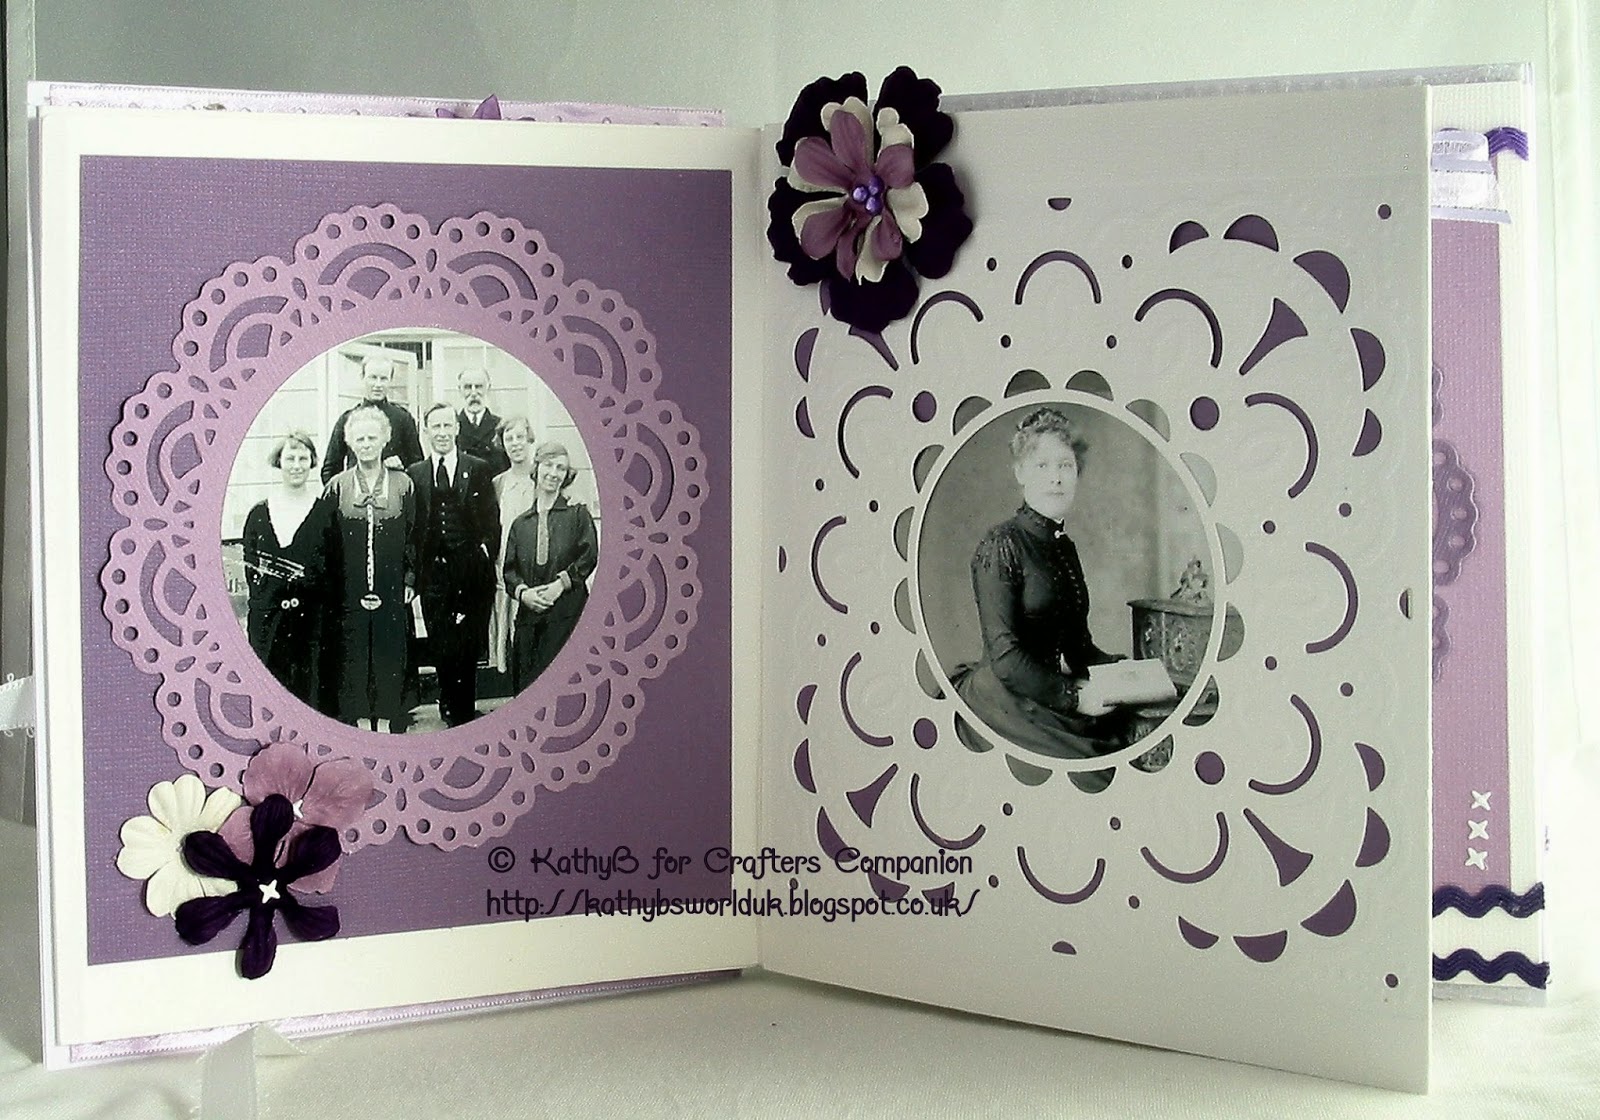
I wanted to try something a bit different with the dies, and as the centre apertures make the perfect frames I thought a zig-zag album might work.  I'm lucky enough to have quite a big collection of old family photos through some family history research I've done and I thought they would be perfect for using in this album

The book is constructed from folded and die cut pages which are overlapped and then inserts of coloured cards are slipped between the layers.  I assembled the book leaving the upper layers unglued so that I could just slip the photos in and then seal the edges. 
As the book folds out completely and there are photos on both sides, it is all kept together with a ribbon that is fixed on the back cover then tied at the front


I used Centura Pearl with a Hint of Silver card for the cover pieces and white Bazzill for the pages.  The coloured inserts behind the pages, and the extra coloured die cut "pages" are Coredinations card.
All the dies used are from Crafters Companion - I've used:
Create a Card Precious
Create a Card Extravagance
Chantilly lace Stamping Frame
Also from
Crafters Companion
Centura Snow White with a Hint of Silver
Coredinations card in two shades of purple
Collal Glues

I wish I'd checked the photos before I sent this off - I'd have taken better photos - or got OH to do them for me ;)
I should probably have set up the bigger photo cube to do them in as the one I usually use is a bit small to show off the album and all the folds.  Hey ho, maybe one day I'll remake it for myself and learn from my mistakes........yes, I can hear you saying it....."that'll be the day"!


Thanks for popping by, I hope you like my album - please leave a message, it's always lovely to hear from you!

Friday, May 09, 2014

Kickin'

This week Jo is in the  The Daring Cardmakers 
challenge-setter's hotseat! 
Now Jo and her boys love football and are no doubt getting nicely excited about all the football-craziness coming up this summer.  I do not like football, but grew up in the sort of family where if there was football on the telly, it was on the telly.  Full Stop.  Like it or Lump it.
I lumped it

However, with a lot of football fans in the family I do make quite a few themed cards for birthdays each year and in May particularly!  So Jo's dare was just the ticket for getting one of our nephew's cards done and dusted.

Here it is, a rocker card with a giant football and net.  This card is about 20cms "square"

I've used;
Black, white, green and red Bazzill card
Football, net, banner and lettering all cut from my own templates using the Silhouette Cameo
Punched stars
Large circle base is an Xcut die

Will you be playing ball with us this week?  There's plenty more inspiration over on our Blog, so please pop by and have a look

Thanks for visiting


Friday, May 02, 2014

May Colours

Miri has chosen the palette for this month's colour combo challenge over on The Daring Cardmakers and there's a gorgeous inspiration photo to go with it

Here's my card:
I've used;
Papers from the current Crafty Templates/Quirky Kit
Embossing folder from Crafters Companion
Coredinations card for the flowers, which I cut on the Silhouette cameo
Leaves are cut with a Spellbinders die
Ribbons, trims, lace and inks from my stash

This is Miri's inspiration photo:

The DCM blog looks stunning this week - please pop over and see what everyone has made using these gorgeous colours, and it would be fab if you'd join in with us this week

Thanks for looking