Friday, August 28, 2015

Cherry Ripe!

It's Jo's turn to set the challenge for The Daring Cardmakers this week and as the orchard at the bottom of her garden is brimmimg with produce she's set this theme for us:
Feeling Fruity!

There's lots of fruity goodness to be harvested at the moment so this week, (we've been eating lots of crumble!) I would like to see a card with some fruit featured.

The DT have as ever created beautiful cards, and don't forget that there is still time to enter our joint blog hop with Ruby Rock-it, all the details are here.
 I was a bit stumped on what to do for this one as I don't have much fruity-themed stash.  Eventually decided to go with a cherry theme as I remembered I have an embossing folder with cherries on it from my time on the Die'Sire DT.  I did wonder if it was something I'd ever use again!
Info:
Smooth white card blank embossed with "Cherrylicious" 6x6 embossing folder (Crafter's Companion)
Extra white card, plus cherry red Bazzill for focus panel
Wording is PC generated and cut into tabs
Cherry Pie:
I inked over some creamy-pale brown Bazzill card with a slightly deeper Distress Ink using a baby wipe to move the colour around
I hand cut narrow strips (abt 5mm) and inked the edges of them with a reddish-brown Versamagic pad.
The strips were woven together to make a piece large enough to cut the oval top of the pie and glued onto red card.
Oval shape them cut at an angle from the woven card using a Spellbinders Nested Ovals die - the oval was a bit "fat" so I trimmed round with scissors till I got the shape I wanted
Pie base cut free-hand from more of the inked card and the various pieces adhered to the focus panel
Cherries are cut from red card using a Tiny Circle Xcut punch, then dots of white ink added for highlights
The stem is just hand cut from brown card and the cherries and stem glued in place on the pie
When the white ink was dry I added Glossy Accents to the cherries

Quite simple really - I like the way the pie crust worked out, and just for once I managed not to prod the Glossy Accents before it was dry, so that looks good too!
It would be great if you'd pop over to the DCM BLOG to see the other cards - it really looks fab this week.
Plus of course we have the Blog Hop with Ruby Rock-It going on - comments close 8am UK time Saturday 29th, so if you want to win the gorgeous prize from Ruby Rock-It, you need to get cracking 
Thanks for visiting

Tuesday, August 25, 2015

Ruby Rock-It and Daring Cardmakers Blog Hop

Hello!
Thank you for visiting! I'm so proud to be the first "port of call" on this blog hop.  Before I show you my project, here is all the info you need to join in with the hop, and maybe win some fabby new stash just for checking out all the lush projects we've been making: 


Hello Ruby Rock-It and Daring Cardmakers Fans!  


We are so excited to be teaming up with this fabulous group of crafters!

We have a fun blog hop that we are kicking off today!!

Yes, that’s right, you can sit, relax, and hop through the blogs of our Creative Team members as we show you what we have been creating!

Here’s your blog hop order…


Here’s the details:  Enjoy the hop and leave a comment for each of our fabulous designers along the way, and be sure to leave one on your last stop the Ruby Rock-It blog!  For those that follow until the end leaving your sweet sentiments along the way, will be entered to win a fabulous prize from us!  We will announce our winner the first week of September!

So, what have I been making with my Ruby Rock It goodies?  Well after having a great old time making cards for the Baby and Birthday themed challenges we've done on the Daring Cardmakers over the last few weeks, I thought I'd mix up all the lovely stash and see how I could put it together to make something a bit different.
What I ended up with was this 21st Birthday, pink, purple, fluffy and flowery cracker, and pocket gift tag to go with it

From Ruby Rock It I used:
Mulberry paper flowers. Sentiment Sticker, Tag and Pocket, Wooden Numerals

I hope you like it - don't forget to leave that all-important comment and then....

It's time to head on over to Erin's blog

Happy Hopping!

Friday, August 21, 2015

Boy Trouble

It's Lythan's turn to set the challenge fro the Daring Cardmakers this week:
".... as I am in the middle of lots of male birthdays the theme is
Let's hear it for the boys
Its time to see some of those cards for men.
What are the things you add to a card to make it more pleasing to the masculine eye? (Yes, I want to shamelessly steal some ideas!)"

This was a good opportunity to tick off my list one of the male cards I need to get done soon.  I've made this for my nephew - a break away from the usual football-themed cards I make for him, mainly because I'm bored to the back teeth of trying to do football in different ways! Now he's a grown up 23 he can put up with the occasional "grown up" card.  That's my excuse anyway


This sort of "grew" in the making!  It was going to be a simple plain white card with the panel of die cut stars just being the blue upper layer and the striped lower layer. 

Then the sheet of corrugated card left over from last week's challenge caught my eye and one thing led to another....as they do!

Materials and Tools:
Papers: "Man's World" from "Now That's Funky" (Funky Hand)
Corrugated card panel, inked dark brown 
PC generated sentiment tabs
Star Nested dies (Taylored Expressions) 
Tiny Star punch


I quite like the LO I finally came up with for this so I may use it again!

Pop over to the DCM BLOG and be inspired by the rest of our Male cards this week - so many fab ideas for those tricky chappy cards :)

Thanks for visiting


Friday, August 14, 2015

Lumpy and Bumpy

This week it's my turn to set the challenge for the Daring Cardmakers and I've asked for lots of Touchy, Feely Texture on this week's cards.  The idea being that the cards feels as good as they look because it has so much interesting texture on there
I used some corrugated cardboard from some packaging as the base part of my card.  When I removed the upper brown paper from the cardboard I left just a few small pieces of the paper on there for a little extra interest.
The basket weave piece is made using a mix of acrylic paint and texture paste wiped thickly over a stencil 
I've also added some metal elements and some lovely soft velvet to the Texture medley ;)


Materials and Tools 
Smooth White square card blank
Materials and Tools
Corrugated card from packaging
Green Pink, White and Diamond White Bazzill card (flowers)
Acrylic paint (Fresco Finish)
Texture Paste
Velvet ricrac trim, Green sating ribbon
Dragonfly metal charm and circular metal clip
Homemade sentiment sticker
Basketweave Stencil (Crafter's Workshop) 
Flower punch (Xcut)
Dies: 
Tiny Butterfly from Butterfly Trio (Memory Box) 
Leaf Swirls (Spellbinders)

Do you like the flowers? On the picture below, the 2 flowers on the left are some of the ready-made cherry blossom flowers from my stash, the group of 5 on the right are ones I've made.
I love the cherry blossom style flowers that came in a DT box ages ago - but my supply is dwindling now.  I had a hunt around on the web and found large packs for a pretty good price - if you wanted 60 of a single colour. then I found small packs but not so much colour choice and in packs of about 10 for around half the price of the 60s!  
So I wondered about making my own, and realized that I had the right shapes flower punch (though very slightly smaller) and also some stamens - though they were bright white and pearlised which I don't particular;y like so I dipped a load of the stamen ends in some Vanilla Acrylic paint and left them to dry,
A bit of inking and shaping with ball ended embossing tools and here's what I ended up with


I'm quite chuffed because now I can have whatever colour I want to match my project.  I'll probably make a template to cut very slightly bigger petals on my Silhouette, then cut a batch in white and one in pale cream so that I can just ink them to the colours I want.  If I can source some nicer stamens I'll be able to make these really quickly - I'm not keen on hanging around waiting for stuff to dry! 


Our fabulous Design Team have made some stunning cards this week - they always do!  You can check them out HERE.  I hope you'll join in with our challenge this week, I'd love to see what you make - even if I can't test the touchy feeliness of it!
Thanks for visiting, please leave a message :)

Monday, August 10, 2015

Anniversary LOVE

Today I'm sharing the card I made for my hubby for our Wedding Anniversary at the end of July.  He's not a great one for anything too fussy, so no ribbons or flowers on this one.  I did manage to sneak in a nice red pearl heart though ;)
Materials and Tools
17x21cm card white blank, edges inked dark brown
All paper designs "Now That's Funky!" CD (Funky Hand), printed onto Diamond White Bazzill card
PC Generated sentiment
small red pearl heart
LOVE letters cut on Cameo; 4 times on black card, 1 in patterned for top layer
Hearts cut using Die-Namics Nested Hearts die set
Sentiment panel; "selective cutting" using Spellbinders Labels 26
Versamagic Chalk inks for edging
Cereal-box chipboard for adding dimension


 I love the effect you get when you print on the Diamond White card - it really adds an extra lustre to the designs.  I added a bit of a curved edge to the hearts by rubbing a large embossing ball tool around the edges on the wrong side, then using scraps of chipboard to adhere them to the card


To celebrate our anniversary we went out for an afternoon jaunt, eventually heading for Newmarket where we'd booked a Afternoon Tea at the Bedford Lodge Hotel

We'd not been there before, but the reviews were really good so it was worth a try.  We arrived early, but this was no trouble to the friendly, helpful staff, even though it was a race night at Newmarket and the hotel was really busy when we arrived. We were seated in a quiet corner of the lounge bar, which was really pleasant
With our booking we'd checked that likes and dislikes could be catered for and this was fine with the catering staff - you'd be amazed at how unhelpful some places are though.
Tea and coffee arrived first and were refilled throughout the meal.  If anything could be improved on it would be the drinks as they were a bit weak and not as piping hot as we'd have liked.  
The food arrived in stages, and always beautifully presented, the first two courses on pretty, tiered stands.  You can click on them for a better view ;)
First came tasty, freshly made sandwiches. 


Next came four delicious scones, with not only the usual jam and clotted cream, but with home made lemon curd too


It was probably these scones - they're much bigger than ones  we've had in other places, and far too delicious to leave - that meant we didn't manage to make much headway with what came next - a pretty plateful of gorgeous little cakes and two fruity, creamy, crunchy concoctions with edible cute chocolate spoons!

Oh My!  we were so stuffed!  Fortunately the staff are used to this and all the cakes we failed to eat were presented in a gift box for us to bring home. 
I'd definitely recommend this place if you're in the area; you're made to feel really welcome, the staff are just lovely - so friendly and helpful, and the food tastes as good as it looks!

 
Just looking at the photos has made me feel peckish, so it's probably good that it's lunchtime!

Thanks for popping by, please leave a comment, I love to read them :)


Friday, August 07, 2015

Random Thoughts


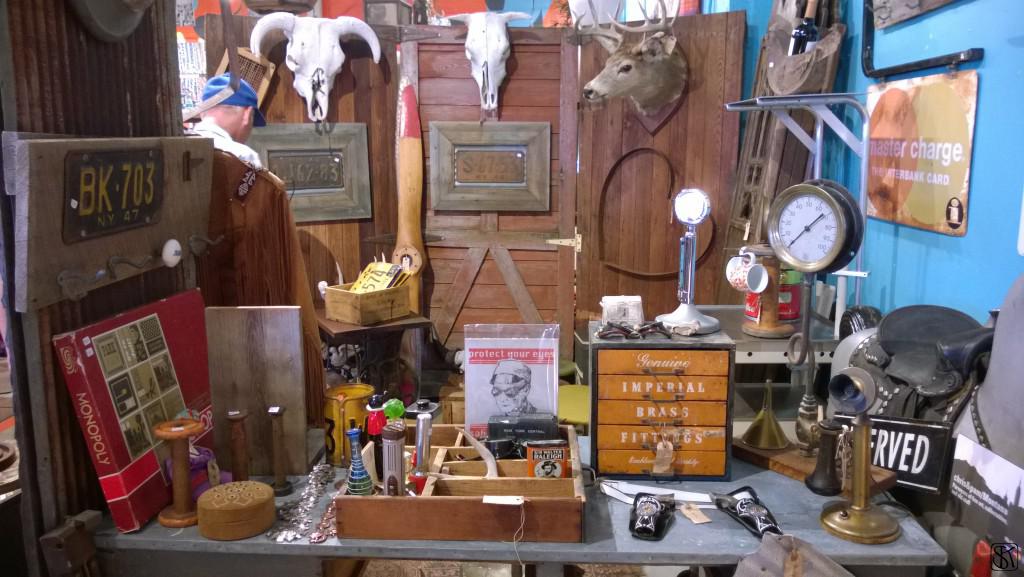
When I first saw Svenja's choice of picture for this week's "August Elemental Inspiration" Picture challenge I thought, "Lots to work with there, shouldn't be too tricky....".  But no! although there are loads of things to work with I really struggled to come up with something.  So in the end I went with the Chuck Everything In method :) - sometimes I do this with flowers, lace, ribbons et al and get a surprisingly soft, pretty effect, but this time I came up with this Steampunk-inspired card, which once I'd actually started I had a huge amount of fun with, and made a huge amount of mess all over the room as I hunted out treasures to use


Before I try to record all the stuff I used, here's Svenja's Inspiration photo - click for a closer look at everything in the display

There are loads of "layers" on this one I'll go through it from the card blank up!


Smooth White card blank
Smooth White card square for next layer

Blue background Element:
2 colours Distress Inks, direct to paper, then "moved" around with a wet wipe
2 colours of Spray Mists, deep blue and turquoise-blue

Ink Splodge stencil (Tando) with Black Ink
RubOn borders (Imaginisce), they are old but I think called "off the edge"
RubOn "Random Thoughts" from a booklet of monograms and headings like this (old, can't remember where from)

I stopped using RubOns because they were so unreliable and rarely transferred properly, but for grungy stuff like this they are perfect as it doesn't matter if some bits don't transfer well ;)

At this point I trimmed down the square slightly, inked the edges and adhered to the card blank

Next
wood element;
Tore across strip of brown Bazzill card and embossed with "Distressed Stripes" (Cuttlebug), Inked over for depth of colour 

Monopoly Element;
Resized and printed out onto card an image of the board from Google, then grouped this together with a miniature postcard (Fruit Pixie) and some die-cut cogs (Tim Holtz)

Upper Layer
Cream Lace, Buttons (hessian covered one from Nikki Sivills), 
Pen Nib, Clock Face, Thermometer (all from The  Fruit Pixie) 
Top Hat cut from a miniature postcard (Fruit Pixie) 
Wooden arrows inked black (Ruby Rock-It)

Candlestick Telephone Element;
I used a "colouring page" image found on the web to make a cutting template to use with Silhouette Cameo

Even with all that "stuff" it seemed to need something more so I added a shot of colour with the cherry blossom flower and a black-inked leaf

My other "element" is the general array of eclectic bits and bobs in the photo - you could spend ages in there, sifting though all those treasures, couldn't you?

I do like a bit of arty-farty-steampunky, but I'm not sure I know anyone I send cards to who this would appeal to so I'm thinking I'll probably keep it for my shelf - maybe "tweak" it a bit to make it more of a picture or canvas sort of thing.


It would be great to see you join in with us this week, you can check out the other fantastic creations HERE

Thanks for visiting, I hope you'll leave a message